Scaling
In this example, you'll learn how to set up a simple ClickHouse cluster which scales. There are five servers configured. Two are used to shard the data. The other three servers are used for coordination.
The architecture of the cluster you will be setting up is shown below:
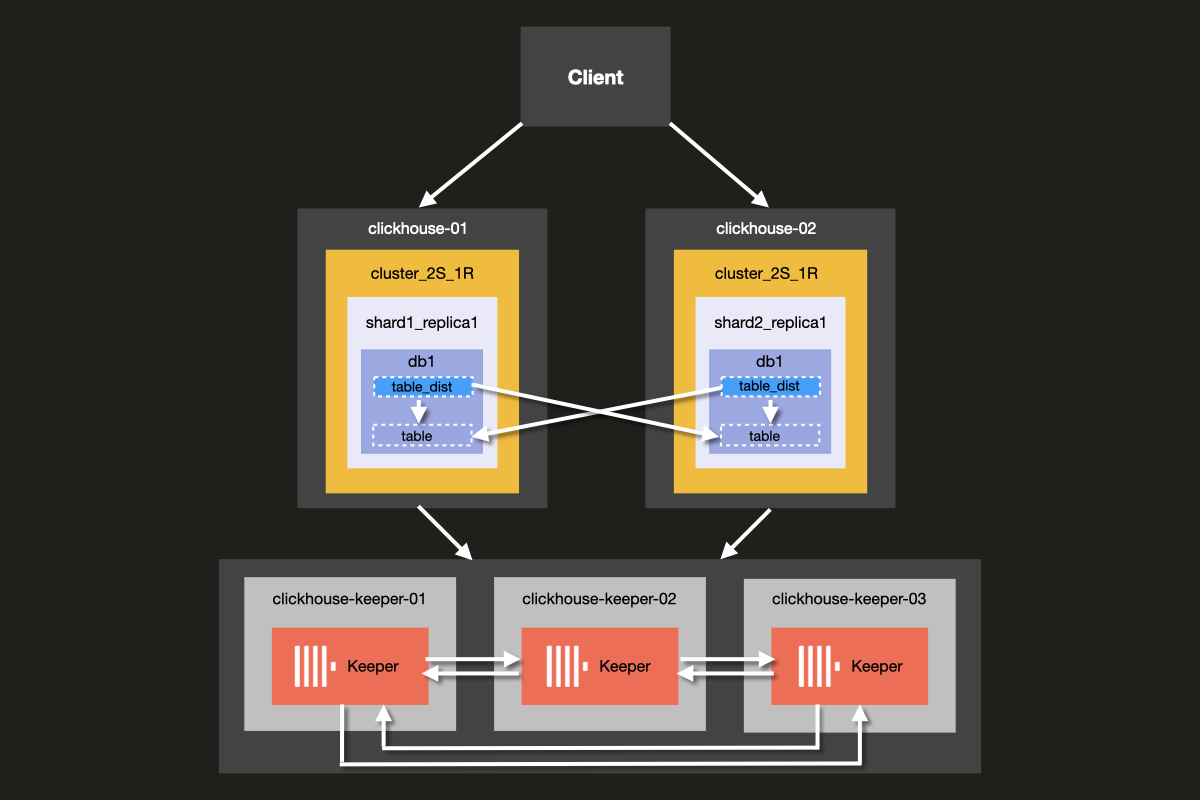
Although it is possible to run ClickHouse Server and ClickHouse Keeper combined on the same server, we strongly recommend using dedicated hosts for ClickHouse keeper in production environments, which is the approach we will demonstrate in this example.
Keeper servers can be smaller, and 4GB RAM is generally enough for each Keeper server until your ClickHouse Servers grow large.
Prerequisites
- You've set up a local ClickHouse server before
- You are familiar with basic configuration concepts of ClickHouse such as configuration files
- You have docker installed on your machine
Set up directory structure and test environment
The following steps will walk you through setting up the cluster from scratch. If you prefer to skip these steps and jump straight to running the cluster, you can obtain the example files from the examples repository
In this tutorial, you will use Docker compose to set up the ClickHouse cluster. This setup could be modified to work for separate local machines, virtual machines or cloud instances as well.
Run the following commands to set up the directory structure for this example:
Add the following docker-compose.yml file to the clickhouse-cluster directory:
Create the following sub-directories and files:
- The
config.ddirectory contains ClickHouse server configuration fileconfig.xml, in which custom configuration for each ClickHouse node is defined. This configuration gets combined with the defaultconfig.xmlClickHouse configuration file that comes with every ClickHouse installation. - The
users.ddirectory contains user configuration fileusers.xml, in which custom configuration for users is defined. This configuration gets combined with the default ClickHouseusers.xmlconfiguration file that comes with every ClickHouse installation.
It is a best practice to make use of the config.d and users.d directories when
writing your own configuration, rather than directly modifying the default configuration
in /etc/clickhouse-server/config.xml and etc/clickhouse-server/users.xml.
The line
Ensures that the configuration sections defined in the config.d and users.d
directories override the default configuration sections defined in the default
config.xml and users.xml files.
Configure ClickHouse nodes
Server setup
Now modify each empty configuration file config.xml located at
fs/volumes/clickhouse-{}/etc/clickhouse-server/config.d. The lines which are
highlighted below need to be changed to be specific to each node:
| Directory | File |
|---|---|
fs/volumes/clickhouse-01/etc/clickhouse-server/config.d | config.xml |
fs/volumes/clickhouse-02/etc/clickhouse-server/config.d | config.xml |
Each section of the above configuration file is explained in more detail below.
Networking and logging
External communication to the network interface is enabled by activating the listen host setting. This ensures that the ClickHouse server host is reachable by other hosts:
The port for the HTTP API is set to 8123:
The TCP port for interaction by ClickHouse's native protocol between clickhouse-client
and other native ClickHouse tools, and clickhouse-server and other clickhouse-servers
is set to 9000:
Logging is defined in the <logger> block. This example configuration gives
you a debug log that will roll over at 1000M three times:
For more information on logging configuration, see the comments included in the default ClickHouse configuration file.
Cluster configuration
Configuration for the cluster is set up in the <remote_servers> block.
Here the cluster name cluster_2S_1R is defined.
The <cluster_2S_1R></cluster_2S_1R> block defines the layout of the cluster,
using the <shard></shard> and <replica></replica> settings, and acts as a
template for distributed DDL queries, which are queries that execute across the
cluster using the ON CLUSTER clause. By default, distributed DDL queries
are allowed, but can also be turned off with setting allow_distributed_ddl_queries.
internal_replication is set to true so that data is written to just one of the replicas.
For each server, the following parameters are specified:
| Parameter | Description | Default Value |
|---|---|---|
host | The address of the remote server. You can use either the domain or the IPv4 or IPv6 address. If you specify the domain, the server makes a DNS request when it starts, and the result is stored as long as the server is running. If the DNS request fails, the server does not start. If you change the DNS record, you need to restart the server. | - |
port | The TCP port for messenger activity (tcp_port in the config, usually set to 9000). Not to be confused with http_port. | - |
Keeper configuration
The <ZooKeeper> section tells ClickHouse where ClickHouse Keeper (or ZooKeeper) is running.
As we are using a ClickHouse Keeper cluster, each <node> of the cluster needs to be specified,
along with its hostname and port number using the <host> and <port> tags respectively.
Set up of ClickHouse Keeper is explained in the next step of the tutorial.
Although it is possible to run ClickHouse Keeper on the same server as ClickHouse Server, in production environments we strongly recommend that ClickHouse Keeper runs on dedicated hosts.
Macros configuration
Additionally, the <macros> section is used to define parameter substitutions for
replicated tables. These are listed in system.macros and allow using substitutions
like {shard} and {replica} in queries.
These will be defined uniquely depending on the layout of the cluster.
User configuration
Now modify each empty configuration file users.xml located at
fs/volumes/clickhouse-{}/etc/clickhouse-server/users.d with the following:
| Directory | File |
|---|---|
fs/volumes/clickhouse-01/etc/clickhouse-server/users.d | users.xml |
fs/volumes/clickhouse-02/etc/clickhouse-server/users.d | users.xml |
In this example, the default user is configured without a password for simplicity. In practice, this is discouraged.
In this example, each users.xml file is identical for all nodes in the cluster.
Configure ClickHouse Keeper
Keeper setup
In order for replication to work, a ClickHouse keeper cluster needs to be set up and configured. ClickHouse Keeper provides the coordination system for data replication, acting as a stand in replacement for Zookeeper, which could also be used. ClickHouse Keeper is, however, recommended, as it provides better guarantees and reliability and uses fewer resources than ZooKeeper. For high availability and to keep quorum, it is recommended to run at least three ClickHouse Keeper nodes.
ClickHouse Keeper can run on any node of the cluster alongside ClickHouse, although it is recommended to have it run on a dedicated node which allows scaling and managing the ClickHouse Keeper cluster independently of the database cluster.
Create the keeper_config.xml files for each ClickHouse Keeper node
using the following command from the root of the example folder:
Modify the empty configuration files which were created in each
node directory fs/volumes/clickhouse-keeper-{}/etc/clickhouse-keeper. The
highlighted lines below need to be changed to be specific to each node:
| Directory | File |
|---|---|
fs/volumes/clickhouse-keeper-01/etc/clickhouse-server/config.d | keeper_config.xml |
fs/volumes/clickhouse-keeper-02/etc/clickhouse-server/config.d | keeper_config.xml |
fs/volumes/clickhouse-keeper-03/etc/clickhouse-server/config.d | keeper_config.xml |
Each configuration file will contain the following unique configuration (shown below).
The server_id used should be unique for that particular ClickHouse Keeper node
in the cluster and match the server <id> defined in the <raft_configuration> section.
tcp_port is the port used by clients of ClickHouse Keeper.
The following section is used to configure the servers that participate in the quorum for the raft consensus algorithm:
Test the setup
Make sure that docker is running on your machine.
Start the cluster using the docker-compose up command from the root of the cluster_2S_1R directory:
You should see docker begin to pull the ClickHouse and Keeper images, and then start the containers:
To verify that the cluster is running, connect to either clickhouse-01 or clickhouse-02 and run the
following query. The command to connect to the first node is shown:
If successful, you will see the ClickHouse client prompt:
Run the following query to check what cluster topologies are defined for which hosts:
Run the following query to check the status of the ClickHouse Keeper cluster:
The mntr command is also commonly used to verify that ClickHouse Keeper is
running and to get state information about the relationship of the three Keeper nodes.
In the configuration used in this example, there are three nodes working together.
The nodes will elect a leader, and the remaining nodes will be followers.
The mntr command gives information related to performance, and whether a particular
node is a follower or a leader.
You may need to install netcat in order to send the mntr command to Keeper.
Please see the nmap.org page for download information.
Run the command below from a shell on clickhouse-keeper-01, clickhouse-keeper-02, and
clickhouse-keeper-03 to check the status of each Keeper node. The command
for clickhouse-keeper-01 is shown below:
The response below shows an example response from a follower node:
The response below shows an example response from a leader node:
With this, you have successfully set up a ClickHouse cluster with a single shard and two replicas. In the next step, you will create a table in the cluster.
Create a database
Now that you have verified the cluster is correctly setup and is running, you will be recreating the same table as the one used in the UK property prices example dataset tutorial. It consists of around 30 million rows of prices paid for real-estate property in England and Wales since 1995.
Connect to the client of each host by running each of the following commands from separate terminal tabs or windows:
You can run the query below from clickhouse-client of each host to confirm that there are no databases created yet, apart from the default ones:
From the clickhouse-01 client run the following distributed DDL query using the
ON CLUSTER clause to create a new database called uk:
You can again run the same query as before from the client of each host
to confirm that the database has been created across the cluster despite running
the query only clickhouse-01:
Create a table on the cluster
Now that the database has been created, you will create a distributed table.
Distributed tables are tables which have access to shards located on different
hosts and are defined using the Distributed table engine. The distributed table
acts as the interface across all the shards in the cluster.
Run the following query from any of the host clients:
Notice that it is identical to the query used in the original CREATE statement of the
UK property prices example dataset tutorial,
except for the ON CLUSTER clause.
The ON CLUSTER clause is designed for distributed execution of DDL (Data Definition Language)
queries such as CREATE, DROP, ALTER, and RENAME, ensuring that these
schema changes are applied across all nodes in a cluster.
You can run the query below from each host's client to confirm that the table has been created across the cluster:
Insert data into a distributed table
Before we insert the UK price paid data, let's perform a quick experiment to see what happens when we insert data into an ordinary table from either host.
Create a test database and table with the following query from either host:
Now from clickhouse-01 run the following INSERT query:
Switch over to clickhouse-02 and run the following INSERT query:
Now from clickhouse-01 or clickhouse-02 run the following query:
You will notice that only the row that was inserted into the table on that particular host is returned and not both rows.
To read the data from the two shards we need an interface which can handle queries across all the shards, combining the data from both shards when we run select queries on it, and handling the insertion of data to the separate shards when we run insert queries.
In ClickHouse this interface is called a distributed table, which we create using
the Distributed table engine. Let's take a look at how it works.
Create a distributed table with the following query:
In this example, the rand() function is chosen as the sharding key so that
inserts are randomly distributed across the shards.
Now query the distributed table from either host and you will get back both of the rows which were inserted on the two hosts:
Let's do the same for our UK property prices data. From any of the host clients,
run the following query to create a distributed table using the existing table
we created previously with ON CLUSTER:
Now connect to either of the hosts and insert the data:
Once the data is inserted, you can check the number of rows using the distributed table:
If you run the following query on either host you will see that the data has been
more or less evenly distributed across the shards (keeping in mind the choice of which
shard to insert into was set with rand() so results may differ for you):
What will happen if one of the hosts fails? Let's simulate this by shutting down
clickhouse-01:
Check that the host is down by running:
Now from clickhouse-02 run the same select query we ran before on the distributed
table:
Unfortunately, our cluster is not fault-tolerant. If one of the hosts fails, the cluster is considered unhealthy and the query fails compared to the replicated table we saw in the previous example for which we were able to insert data even when one of the hosts failed.
Conclusion
The advantage of this cluster topology is that data gets distributed across separate hosts and uses half the storage per node. More importantly, queries are processed across both shards, which is more efficient in terms of memory utilization and reduces I/O per host.
The main disadvantage of this cluster topology is, of course, that losing one of the hosts renders us unable to serve queries.
In the next example, we'll look at how to set up a cluster with two shards and two replicas offering both scalability and fault tolerance.
